Category Archives: Garlic Press

Meatball Traybake

IMG_3096.JPG

This is another super simple, and cost conscious recipe adapted from The Sainsbury’s magazine.  I don’t know whether I have raved about this publication before but if I have I’m going to again.  If you are in the UK and you like food then I rate this magazine over all other offerings.  As the mag was originally launched by Delia all recipes are triple checked and I have NEVER found a fault with any of them.  In fact, it has been known for me to host a dinner party and make 3 completely new recipes straight out of the magazine! It hasn’t failed me yet!!!If you are outside of the UK – you can get a subscription… and it’s worth it in my humble opinion.

Anyway, back to the recipe.  This is a fabulous Rectangular Baker – one pot recipe ( and you know how much I love those!).  If you don’t have one of those you could use a Deep Covered Baker or even a Deep Dish Baker.  The ingredient list may seem a little longer than some of my normal recipes but most of them are things that I already have in the house – so I don’t feel it is heavy on the shopping list.

Ingredients

1.25kg potatoes
2 tbsp olive oil
1x 500g Carton Passata
1 Chicken Stock Cube or melt, dissolved in 200ml of boiling water
150g slightly stale Bread (the original recipe states white but I rarely eat white – so whatever you have in your house works)
150ml Milk
1 x 500g 20% fat Beef Mince
1 Egg beaten (medium is suggested but I only seem to buy large so…!)
1 small Onion, chopped finely with Food Chopper
2 Garlic Cloves, crushed
1 tsp Smoked paprika
1 Lemon
1/2 pack of cut coriander
100g Green Beans, top and tailed, cut in half

Method

  • Preheat the oven to 200C, Fan 180, Gas 6.  Wedge the potatoes, using the Veggie Wedger, and put into the Rectangular baker.  Add 1tbsp oil and toss the potatoes to coat them.  Add the passata and stock.  Stir.  Bake in the oven for 35-40 minutes.
  • Whilst the potatoes are baking, make the meatballs.  I use either my Food Chopper or Microplane grater to make the breadcrumbs.  If you want to make your food processor dirty then, by all means use that instead!  Add the breadcrumbs and milk to a Classic Batter Bowl (CBB).  Leave to soak for 5 minutes; add the beef, beaten egg, chopped onion, crushed garlic and paprika.  Use the Microplane Zester to zest the lemon and add to the CBB.  Pick the leaves from the coriander stalks, roughly chop them and keep to one side.  Finely chop the coriander stalks and add to the CBB.  Season the mix and get your hands in there!!  (I often ask one of my kids to help me to make these. This is their favourite activity – getting their hands well and truly involved in making tea!!)  Roll 28 or so walnut-sized meatballs and put on a plate.
  • Take the potatoes out.  Stir.  Add the meatballs.  Cook for another 20 minutes.
  • Blanch the green beans for 2-3 minutes, until just tender.  For me, that means popping into a Micro-Cooker with a tiny splash of water and giving them a 2 minute blast.  If you don’t have a Micro- Cooker, then just add the beans to boiling water for  the necessary time and then drain well.
  • When the meatballs have had their 20 minutes, add the green beans to the baker and bake for a further 10 minutes.  By this time the potatoes will be tender and the meatballs goldenand cooked through.
  • Drizzle over the remaining 1tbsp oil, scatter over the coriander leaves you kept from earlier.  Take the baker to the table and serve along with quarters of the lemon from earlier.


Leave a comment

Filed under Batter Bowl, Deep Covered Baker, Deep Dish Baker, Easy Cooking, Eggs, Family Cooking, Food Chopper, Garlic, Garlic Press, Microplane Grater, Other, Pepper, Potatoes, Rectangular Baker, Tea

Mushroom Risotto – Oven Baked… no Stirring?!!

Here is the second of my 2 surprisingly fabulous recipes I’m sharing with you tonight!!  Pampered Chef Stoneware is amazing stuff which allows you to do many “chuck and bung” meals, where you literally chuck the ingredients in the Stoneware and Bung it all in the oven to cook.  Risotto is one of those recipes which just looks like you are doing magic rather than just cooking!  Honestly, this risotto takes about 6 minutes to prepare (tops) and then you bung it in the oven until its done.  No stirring, no hassle, no waiting by the hob for half an hour – just Chuck and Bung!!  Plus, it actually tastes really, really delicious?!!  (That I wasn’t expecting!!!)  Enjoy.

Oven Baked Mushroom Risotto - No Stirring!!

Oven Baked Mushroom Risotto – No Stirring!!

Ingredients 

1 box Arborio rice (500g)
1 box closed cup mushrooms
1 box chestnut mushrooms
1 onion
Veg stock cubes
Fresh parsley
2 cloves garlic
100g grated Parmesan
Med. Pot double cream or crème fraiche

Method

  1. Boil the kettle and put the oven on at 200c.
  2. Finely chop onion using Food Chopper and add to Rectangular Baker.
  3. Using Egg Slicer Plus and/ or Forged Cutlery Knife slice both boxes of mushrooms. Add to Rectangular Baker.
  4. Add box of rice to Baker.
  5. Using Easy Read measuring Cup measure 1 litre of boiling water. Add double the amount of stock cubes than is recommended on the box (stops it being too bland). Add to Rectangular Baker.
  6. Put the coriander in the 250ml Prep Bowl and chop using the Professional Shears. Add to Rectangular Baker.
  7. Crush garlic using Garlic Press and add to the baker (no need to peel the garlic first!). Then using Mix ‘N Scraper stir risotto. Put it in the oven for 30 minutes.
  8. Whilst cooking grate the parmesan using Microplane Adjustable Fine Grater.
  9. When the risotto is cooked remove from the oven. Add parmesan and Cream/ Crème Fraiche. Stir using Mix ‘N Scraper and leave for 5 minutes. Serve.

Leave a comment

Filed under Cream, Deep Covered Baker, Deep Dish Baker, Easy Cooking, Family Cooking, Food Chopper, Garlic Press, Microplane Grater, Mushrooms, Stoneware, Vegetarian

The Pampered Chef ® Pesto Pinwheels Recipe

This is a super quick recipe for a party or nibbles.  Very, very tasty too!

image1

Pesto Pinwheels ready for eating! YUM!!

Ingredients

Sunflower oil, for greasing
1 packet (145 g) pizza base mix
About 100 ml warm (hand hot) water
40 g Parmigiano Reggiano cheese
1 clove garlic
15 g fresh basil leaves
2 tablespoons sun-dried tomato pesto (see Chef’s Corner)

Method

  1. Preheat oven to 200ºC/fan 180ºC/Gas 6.
  2. Lightly brush Medium Bar Pan with sunflower oil; set aside.
  3. Place pizza base mix in Classic Batter Bowl. Measure warm water in Mini Measure-All® Cup; add enough water to pizza base mix, mixing to form a soft dough. Knead dough on lightly floured surface 5 minutes or until smooth.
  4. Roll out dough on a lightly floured surface using outer tube of Mini Measure-All® Cup to form 30 x 17 cm rectangle. Leave to rise 15 minutes.
  5. Meanwhile, finely grate cheese into clean batter bowl using Microplane® Adjustable Fine Grater. Press garlic using Garlic Press into batter bowl and mix gently into cheese using Small Mix ‘N Scraper®.
  6. Roll basil leaves up together and cut into fine strips using Colour Coated Santoku Knife on Bar Board.
  7. Spread pesto evenly over bread dough using back of Small Mix ‘N Scraper®. Sprinkle basil leaves and cheese mixture evenly over pesto.
  8. Starting from a long side, carefully roll up dough rectangle to form a tight roll. Cut roll in half widthways. Cut each dough half widthways into 10 even sized slices using Santoku Knife on Bar Board. Transfer pinwheels onto Medium Bar Pan, spacing apart evenly and neaten into rounds if necessary.
Pesto Pinwheels ready for baking

Pesto Pinwheels ready for baking

Bake 15 – 17 minutes or until pale golden brown. Transfer pinwheels to a serving plate. Serve warm.
Yield: Makes 20

Per serving: Nutrition information per pinwheel: Energy 236kJ/56kcal. Protein 2.2g, Carbohydrate 7.1g, Sugars 0.5g, Fat 2.3g, Saturated fat 0.7g, Fibre 0.3g, Salt 0.2g

Cook’s Tip: Substitute the red pesto with green pesto, if desired.
These appetisers are best served warm and eaten on the day made.

© 2015 The Pampered Chef used under license.

Cook’s Tip: Substitute the red pesto with green pesto, if desired.
These appetisers are best served warm and eaten on the day made.

© 2015 The Pampered Chef used under license.

Leave a comment

Filed under Batter Bowl, Cheese, Easy Cooking, Garlic, Garlic Press, Medium Bar Pan, Medium Round Stone, Microplane Grater

Vegetable Risotto

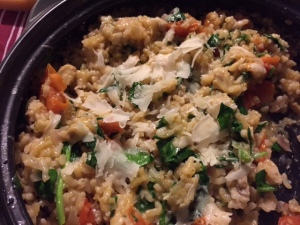
This is a really, really tasty risotto that even my meat-loving family enjoy!!  It is also really, really easy because it is another “Chuck and Bung” recipe where all ingredients are chucked in the Stoneware or RokCrok and then bunged in the oven… no stirring required at all!

Enjoy!

IMG_9231Ingredients:

250-300g cherry tomatoes
Olive oil
1 garlic clove
Baby spinach (good handful)
2 small red onions
1 small red pepper
6 small mushrooms
2 sticks celery
25g butter
225g risotto rice
250ml white wine
450ml boiling water with a vegetable stock cube added (I like Knorr Stockpots)
2 teaspoons sundried tomato paste
50g piece fresh parmesan plus 25g to shave over

Method:

  1. Preheat oven to 180/160fan/Gas 4
  2. Using Food Chopper, finely chop onions and celery.  Slice peppers and mushrooms with Utility Knife. Place in Large Micro Cooker with the butter, put lid on and microwave on high 2 mins. Take out and stir. Cook on high another 2 minutes until vegetables are softened.
  3. Measure stock and wine in Classic Batter Bowl and add with rice and vegetables from micro cooker to Deep Covered Baker or RokCrock. Press in the garlic with the Garlic Press. Slice cherry tomatoes in half and stir in with sun dried tomato paste and a grind of salt andpepper.
  4. Put Deep Covered Baker in oven for 40-45 mins until rice is cooked.
  5. Stir in grated cheese and spinach. Shave over remaining parmesan with Garlic Slicer and drizzle over a little olive oil.

Leave a comment

Filed under Batter Bowl, Cheese, Deep Covered Baker, Easy Cooking, Family Cooking, Food Chopper, Garlic Press, RockCrok, Stoneware, Tomato

Indoor/ Outdoor (Spiced Pork) Burger

This is a really delicious summer recipe.  These burgers are so easy to make.  The result is a succulent, juicy and slightly spicy burger.  I call it the Indoor/ Outdoor Burger because, technically these can be cooked on a BBQ but so far, as I do live in England where the weather just seems to KNOW when I am planning a BBQ, I have always ended up cooking it on a piece of Stoneware in my oven!!!  When I make these at shows I also make a fabulous Roasted Sweet Potato Salad with Citrus-Curry Dressing.  YUM!!!

 Ingredients

2 tablespoons chopped fresh coriander
500g lean minced pork
50g fresh breadcrumbs
1 small piece fresh ginger
2 cloves of garlic,
1 egg
1½ teaspoons garam masala
¼ teaspoon salt

Method

  • Preheat oven to 200/fan 180/Gas 6.
    In Stainless 4-litre Mixing Bowl, place pork, breadcrumbs and egg. Chop coriander using Professional Shears, measure seasoning with Adjustable Measuring Spoons, press garlic & ginger with Garlic Press and combine using Mix n Chop.

    Burgers ready for the oven.

    Burgers ready for the oven.

  • Using the large scoop, form about 8-10 mini-burgers and transfer to Medium Round Stone. Place Measure All Cup over meat & squash into burger shape! Bake for 18-22 minutes or until burgers are lightly browned and fully cooked (juices should run clear when pierced with a knife).
All cooked and ready to eat!!

All cooked and ready to eat!!


These are delicious served with Roasted Sweet Potato Salad and Citrus-Curry Dressing.


2 Comments

Filed under Batter Bowl, Easy Cooking, Family Cooking, Garlic, Garlic Press, Ginger, Medium Bar Pan, Medium Round Stone, Pork, Quick Cooking, Stoneware, Tea

Roasted Sweet Potato Salad with Citrus-Curry Dressing

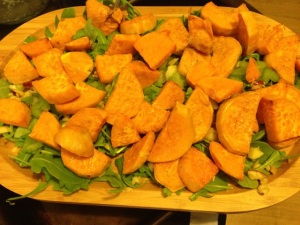
Roasted Sweet Potato Salad with Spicy Pork Burger.  Yummy!   (Apology for the slightly blurry image!)

Roasted Sweet Potato Salad with Spicy Pork Burger. Yummy!
(Apology for the slightly blurry image!)

This salad is the one that I usually serve with the Indoor/Outdoor Burger but is a gorgeous salad all on its own.  The dressing is really luxurious and different.  I would be happy to eat this salad with a couple of friends for a really easy lunch or use it as a side salad with the burgers for 5 or 6 people.  As always, its a Pampered Chef recipe so it is incredibly easy to make, especially if you have a Pampered Chef Serrated Peeler.  This makes easy work of peeling the delicious, if a bit tricky, sweet potatoes!

Ingredients

3 large sweet potatoes (about 1kg in weight), peeled
2 tablespoons of olive oil
Salt and Pepper
1 Red-skinned eating apple
2 sticks of celery
2 spring onions
150g fresh rocket leaves
4 tablespoons mayonnaise
1 orange (4 tbsp juice & 1tsp zest)
1 tablespoon wholegrain mustard
1 teaspoon mild or medium curry powder (or to taste)

Method
1. Cut potatoes crossways into 1cm slices using Santoku Knife; cut slices in half (or quarters if big). Put in Classic Batter Bowl; add oil and toss to coat.
2. Arrange potatoes in a single layer on Rectangle Stone; & season. Bake about 25 minutes, until potatoes are tender and beginning to brown round edges. Remove from oven, cool slightly.
3. For dressing add all ingredients to Measure, Mix and Pour and whisk well until well blended and smooth; (using Microplane Zester, Citrus Press, Mini Measure All Cup & Adjustable Measuring Spoons)
4. Place potatoes in Bamboo Fibre Bowl. Core apple with Apple Wedger and Food Chopper and chop celery with Utility Knife. Use Professional Shears to snip spring onions. Add to potatoes.
5. Drizzle about 5 tbsp of the dressing over potato mixture; toss gently to mix. Place some rocket leaves on plate; drizzle with a little dressing. Place potato mixture over rocket and serve with burgers.

Roasted Sweet Potato Salad without the dressing.

Roasted Sweet Potato Salad without the dressing.

1 Comment

Filed under Batter Bowl, Citrus Fruits, Citrus Press, Deep Covered Baker, Deep Dish Baker, Easy Cooking, Family Cooking, Food Chopper, Garlic Press, Medium Bar Pan, Medium Round Stone, Microplane Grater, Square Baker, Stoneware

Homemade, super-easy Garlic Bread

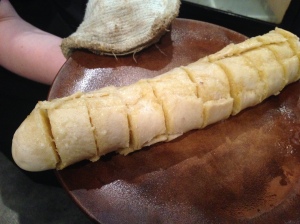
The finished garlic bread - just before the hoards descend!

The finished garlic bread – just before the hoards descend!

I have to give all the credit for this brilliant idea to my good friend Gill.  She showed me how to make my own garlic bread and I have never bought shop-made since.  This bread is just as quick as pre-made, much more tasty and much cheaper and so is a complete no-brainer!!

Ingredients

Part-Baked Baguette(s)
Garlic Cloves
Butter (I recommend real butter rather than marg or spread), room temperature

Method

I use 1 garlic clove and 1oz (25g) butter per baguette,  Obviously if you prefer it to be more garlicky just add more.

  • Preheat oven to 180C/fan 170C/ Gas 6.
  • Add  butter to Prep Bowl, Press garlic clove using Garlic Press into the prep bowl. Use Spreader to mix them together.

    Mix garlic clove & butter together

    Mix garlic clove & butter togethe

  • Slice the baguette using Bread Knife.  Try not to slice all the way through keeping the loaf in tact (not always possible but worth it for aesthetics later!)

    Slice the bread, trying not to go all the way through.

    Slice the bread, trying not to go all the way through.

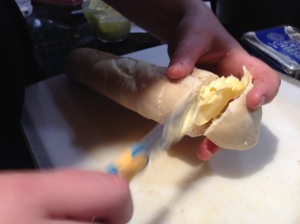
  • Carefully spread the generously between each slice.

    Spread the butter generously between slices.

    Spread the butter generously between slices.

  • Place baguette(s) on Stoneware (Pictured here is a Medium Round Stone with Handles but any will do).  Put Stoneware in oven.

    Bread ready to go into the oven on the Stoneware.

    Bread ready to go into the oven on the Stoneware.

  • Cook for approx 15-18n minutes until bread looks brown and toasty.
  • Devour!!!

    The finished garlic bread - just before the hoards descend!

    The finished garlic bread – just before the hoards descend!


Leave a comment

Filed under Easy Cooking, Family Cooking, Garlic, Garlic Press, Medium Bar Pan, Medium Round Stone, Quick Cooking, Square Baker, Stoneware, Super Quick cooking!, Tea

Deborah Bohl’s Sweet & Sour Chicken

Chuck & Bung Sweet & Sour.... Yum!!

Chuck & Bung Sweet & Sour…. Yum!!

I have been given a new “Chuck and Bung” recipe by my Pampered Chef colleague Deborah and its a corker!!  This is the easiest sweet and sour recipe I have ever tried and it tastes fabulous.  Deborah did suggest that you can double the sauce ingredients (ketchup, vinegar & sugar) but on my first go yesterday I just made it as the recipe suggest.  Next time I think I shall try the double sauce approach (sorry Deborah for not listening!!)

Ingredients

• 9 tbsp tomato ketchup
• 3 tbsp malt vinegar
• 4 tbsp dark muscovado sugar or other brown sugar
• 2 garlic cloves , crushed
• 4 skinless and boneless chicken breasts, cut into chunks
• 1 small onion , roughly chopped
• 2 red peppers , seeded and cut into chunks
• 227g 8 oz can pineapples pieces in juice, drained
• 100g sugar snap peas , roughly sliced
• handful salted, roasted cashew nuts, optional

Method

Use the Measure All Cup to measure the ketchup and the vinegar, tip into Classic Batter Bowl.

Add the dark brown sugar, using the Adjustable Measuring Spoons.

Use the Garlic Press to add the garlic to the Batter Bowl

Use Forged Cutlery Utility Knife to chop the chicken and add to the mix.

Throw in any chopped veg as desired!  Mix well with Small Mix ‘N Scraper.

Chuck everything into the Rectangular Baker and bung in the oven at 180 for about 35-40 minutes.

Serve with rice! Delicious!!


Options:  change the veg above for baby corn, mushrooms & peppers and leave out the pineapple. Susie

Susie Evans
Independent Sales Director for The Pampered Chef
07854 241575
http://www.pamperedchef.biz/susieevans
http://www.facebook.com/Susie.PChef


Sweet & Sour Ready for the oven.


Leave a comment

Filed under Batter Bowl, Chicken, Deep Covered Baker, Easy Cooking, Family Cooking, Garlic, Garlic Press, Mushrooms, Other, Pepper, Rice, Rice Cooker, Square Baker, Stoneware, Tomato

Sun-Dried Tomato & Goat’s Cheese Jalousie

This is a brand new recipe to me but, apparently, a bit of a classic to The Pampered Chef.  I have never made, nor eaten, a jalousie before – however I am completely won over!  I had been asked to do something different for a show and also a vegetarian recipe.  This was recommended to me and turned out to be an absolute winner.  It is so easy, and yet looks really great, and tastes fabulous.  Sadly, I forgot (again!) to take a photo this time. So I shall just have to make another one!  I think I might make it for a light lunch with friends, or when I am next asked to make something for a bring and share party, or just when I have some spare puff pastry that happens to make its way into my shopping trolley!!

Ingredients

1 packet (425g) frozen ready rolled puff pastry (2 sheets) defrosted
85g sun-dried tomatoes in oil, drained, wiped dry
85g classic green pesto sauce
Plain flour, for dusting
1 log (approx 100-125g) soft goat’s cheese (without rind)
1 egg
1 garlic clove
Sesame Seeds, for sprinkling (optional)
Shredded fresh basil leaves, to garnish (optional)

Method

  1. Preheat oven to 200°C/fan 180°C/Gas 6. Allow pastry to stand at room temperature 15-20 minutes. Meanwhile, snip sun-dried tomatoes into small pieces using Professional Shears. Press garlic with Garlic Press. Combine sun-dried tomatoes and pesto sauce in Classic Batter Bowl; mix well using Master Scraper. Set aside.
  2. Lightly dust Rectangle Stone with a little flour. Place one sheet of pastry on stone. Using Baker’s Roller®, roll pastry to form a 28 x 33 cm rectangle. Spread pesto mixture evenly over pastry using Small Spreader, leaving a 2.5 cm border around edge. Carefully slice each log of goat’s cheese using Utility Knife. Arrange goat’s cheese slices over pesto mixture in single layer. Brush edges of pastry sheet with water using Chef’s Silicone Basting Brush; set aside.
  3. Roll second sheet of pastry on lightly floured, flat surface of Large Grooved Cutting Board (to rectangle of same size). Fold pastry rectangle in half lengthways. On folded-length, cut about 11 cm length strips, about 2.5 cm apart (do not cut through ends).
  4. Gently open pastry sheet and place over filling; press pastry edges together to seal. Using Crinkle Cutter, trim edges of puff pastry; discard trimmings. Flute pastry edges, if desired. Beat egg in Small Bamboo Fibre Bowl with Stainless Mini Whisk; brush over surface of pastry. Sprinkle sesame seeds evenly over top, if desired.
  5. Bake 25-30 minutes or until deep golden brown. Remove to Stackable Cooling Rack; cool slightly. Sprinkle with shredded basil leaves, if desired.
  6. Cut into squares using Pizza Cutter; serve warm using Mini-Serving Spatula.

Leave a comment

Filed under Batter Bowl, Cheese, Easy Cooking, Eggs, Garlic, Garlic Press, Pastry, Stoneware, Tomato

Smoky Chicken & Chorizo Hotpot

Hotpot ready to go in the oven

Hotpot ready to go in the oven

Ingredients

3 chicken breasts and 6oz to 8oz chorizo
Drop of olive oil
1 onion
1 red pepper
1 tin tomatoes
½ pint chicken stock
1 can chick peas (drained)
Salt and pepper
1 tblsp smoked paprika
2 large cloves of garlic
1 chilli (optional)
Good handful of fresh parsley
Crusty French bread to serve

1) Chop onion and red pepper (and chilli if desired) using Food Chopper or Manual Food Processor add to Deep Covered Baker / Rectangular Baker.

2) Draining chick peas using Easy Read Measuring Colander, add to Stoneware.  Add garlic using Garlic Press, smoked paprika using Easy Read Measuring Spoons and tomatoes (chop using Mix ‘N Chop)

3) Snip some fresh parsley using Professional Shears and sprinkle

4) Add ½ pint of chicken stock using Small Batter Bowl

5) Chop Chicken and Chorizo on Cutting Board using Forged Cutlery 13cm Utility Knife and put into Stoneware

6) All ingredients are now in Deep Covered Baker / Rectangular baker (if using a smaller baker just reduce ingredients slightly), stir.

Cook for approx 40 mins in oven at 180c / Gas mark 4

Serve with crusty bread

Hotpot after half was served!

Hotpot after half was served!

Leave a comment

Filed under Batter Bowl, Chicken, Chilli, Deep Covered Baker, Easy Cooking, Family Cooking, Food Chopper, Garlic, Garlic Press, Manual Food Processor, Other, Pork, RockCrok, Tea, Tomato